Menus
A menu is used to connect layouts to users. A menu is typically used to navigate through layouts, it therefore makes sense to make a menu for groups of users who need to view the same layouts. However a user is not limited to one menu, the user can be assigned to multiple menu's.
Creating a menu
Please take the following steps to create a menu:
- Go to Settings.

- Click on Menus.

- Click on New.

- Fill out a label and a name for the menu, users will not see this name/label.
- The 'Groups and users' picklist will display field you can assign the menu to groups and/or individual users.
- By clicking the Save
 button, the menu will be created.
Menu structure
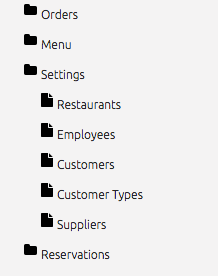
A menu structure can have two levels. The parent and the child level. There can be unlimited parent and child level items. To give you an example on how this looks.

Creating a menu in the setup section.

The result in the user view.
Adding layouts to a menu (one level)
Please take the following steps to add a layout to a menu:
- Click on Add.

- Click the newly created node
 . The Menu Item Properties will appear.
 - Click Edit

- Enter a Label, Translation key and Name.
- Select an Overview Layout and a corresponding Document Layout.
- By clicking the Update
 button, the menu will be created.
 - By clicking the Save
 button, the menu will be saved.
Adding layouts to a menu (two levels)
Please take the following steps to add a layout to a menu:
- Click on Add.
 to create the parent level.
 - Click the newly created node
 . The Menu Item Properties will appear.
 - Click Edit

- Enter a Label, Translation key and Name. Do not select a Layout type.
- Go back to the Menu Structure and click once on the node you just created.
- Click on Add.
 to create the child level.
 - Click the newly created node
 . The Menu Item Properties will appear.
 - Click Edit

- Enter a Label, Translation key and Name.
- Select an Overview Layout and a corresponding Document Layout.
- By clicking the Update
 button, the menu will be created.
 - By clicking the Save
 button, the menu will be saved.
Adding a filter to a menu item
BizzStream allows you to apply a filter to a menu item. This filter is applied on top of the filter that a user himself can set when opening an overview. Users cannot overrule a menu item filter by changing the filter in the overview because a document must pass both filters to be displayed.
Say you set a a menu item filter that requires the status of a document to be "Completed" or "Finished". When the user opens the overview, he/she will only see documents with these two statuses. If the user sets an overview filter that requires the status of a document to be "In Progress", the user will not see any documents because no document can pass both filters at the same time.
Moreover, you can use system currentUser expressions for text fields which are going to be applied for the user who tries to access the menu.
You can set a filter to a menu item by:
- Selecting a menu item
- Click Edit

- Click on Set Filter

- Choose a filter and click on Ok
- By clicking the Update
 button, the menu item will be updated
 - By clicking the Save
 button, the menu will be saved
Assign multiple menus to a user
Users can be assigned to a menu in two different ways:
Via the menu page
To add menu to the user via the menu page:
- Go to Settings.

- Click on Menus.

- Open a menu by double clicking on it.
- Select the users to which you want the menu in the Groups and Users field.
- Click on Save.
Note: Users can also be assigned to a menu when they are part of a group which is added to a menu.
Add a group to a menu via the menu page
To add menu to the user via the menu page:
- Go to Settings.

- Click on Menus.

- Open a menu by double clicking on it.
- Select the groups to which you want the menu in the Groups and Users field.
- Click on Save.
Via a user's environment settings
Alternatively, you can also set a menu to a user by editing the uses's environment settings
- Go to Settings.

- Click on Users.

- Double click on a user
- Set the menu's that you want to assign to a user in the Menus field.
- Click on Save.